Prep Time: 25 minutes
Cook Time 38 minutes
Total Time: 1 hour 3 minutes
Makes 4 servings
For the Zucchini Boats
2 very large zucchini (about 11 ounces each)
1 tablespoon olive oil
1 small yellow squash, diced
1/2 yellow onion, diced
1/2 red bell pepper, diced
1/2 pound ground turkey
2 tablespoons Homemade Taco Seasoning (see recipe)
1 egg, beaten
For the Homemade Taco Seasoning
1 tablespoon chili powder
1 1/2 teaspoons ground cumin
1 teaspoon paprika
1 teaspoon garlic powder
1/2 teaspoon onion powder
1/2 teaspoon dried oregano
1/2 teaspoon sea salt
1/4 teaspoon freshly ground black pepper
Preheat the oven to 400°F.
Mix all the taco seasoning ingredients in a bowl and set it aside.
Use a large knife to cut each zucchini lengthwise in half. Using a melon baller or small spoon, carefully scoop out the insides, leaving a 1/4- to 1/3-inch-thick shell to make room for the filling.
Heat the oil in a heavy, large skillet over medium heat. Add the yellow squash, onion, and bell pepper and sauté until the vegetables begin to soften, about 3 minutes. Add the turkey and taco seasoning and sauté until the turkey is cooked through, about 5 minutes. Remove the skillet from the heat and let the taco filling cool a bit.
When cool, add the beaten egg and mix well. Stuff each zucchini with some of the filling, mounding it slightly and then pressing gently to compact it. Place the boats in a baking pan and bake them uncovered until the zucchini is just tender, about 25 to 30 minutes.
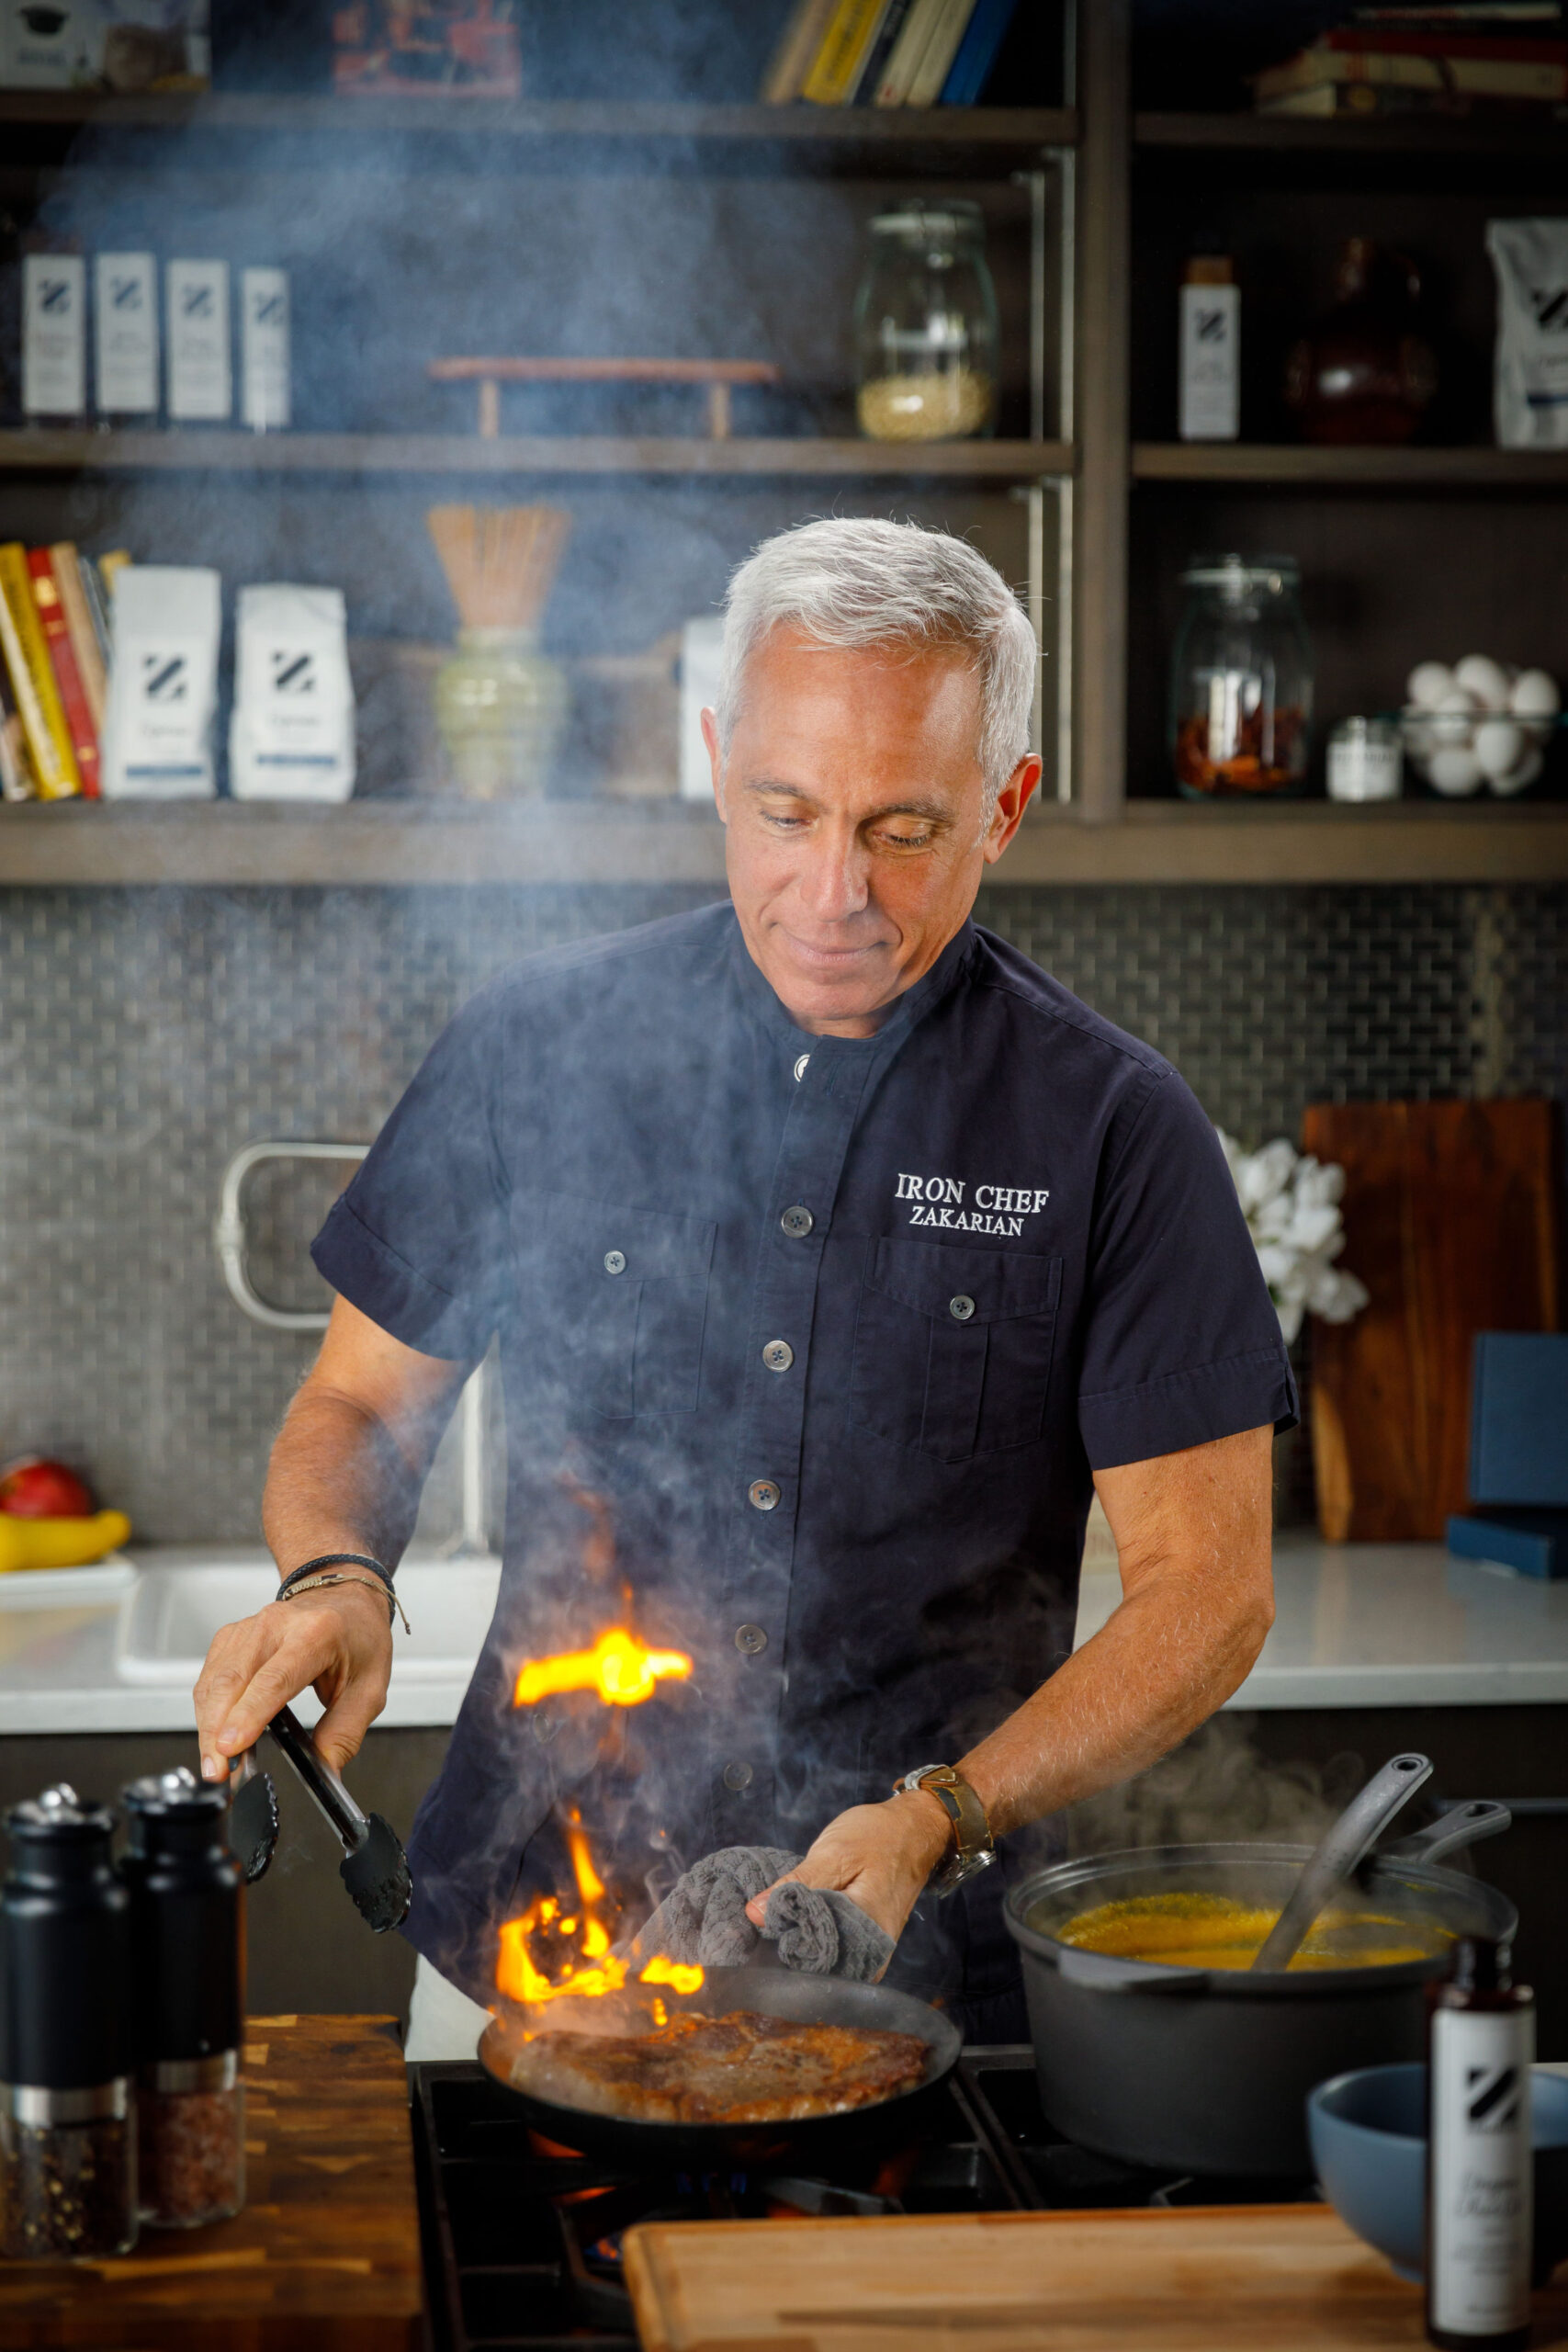
Chef Geoffrey Zakarian
runs restaurants,
frequently appears
on TV, and has his
own line of food and
kitchen products. (Aaron Lockwood)
These days, place settings at your dinner table might look like this: a knife, fork, spoon—and cell phone. You might watch television as you eat.
You’re missing the key to a good meal, says renowned chef Geoffrey Zakarian: family.
Mr. Zakarian learned this lesson at a young age. He grew up in Worcester, Massachusetts, with a Polish American mother and Armenian American father.
“Being Middle Eastern, all we did was cook,” he said. “At breakfast, we’re talking about lunch with our mouths full. At lunch, we’re talking about dinner with our mouths full. It was a never-ending circle.”
Mr. Zakarian saw that a meal was about more than just good food. It was the glue that bonded his family.
“It created a shared devotion around the table,” he said. His love of food and its effect on family eventually led to his calling as a chef.
(Aaron Lockwood)
Fighting Hunger in the City
Mr. Zakarian is not only a prolific chef and restaurateur—whose ventures have included restaurants in New York, Connecticut, Los Angeles, and Florida, where he now lives—but also a long-standing television personality, known for his appearances on the Food Network as an Iron Chef, a recurring judge on “Chopped,” and a co-host on “The Kitchen.”
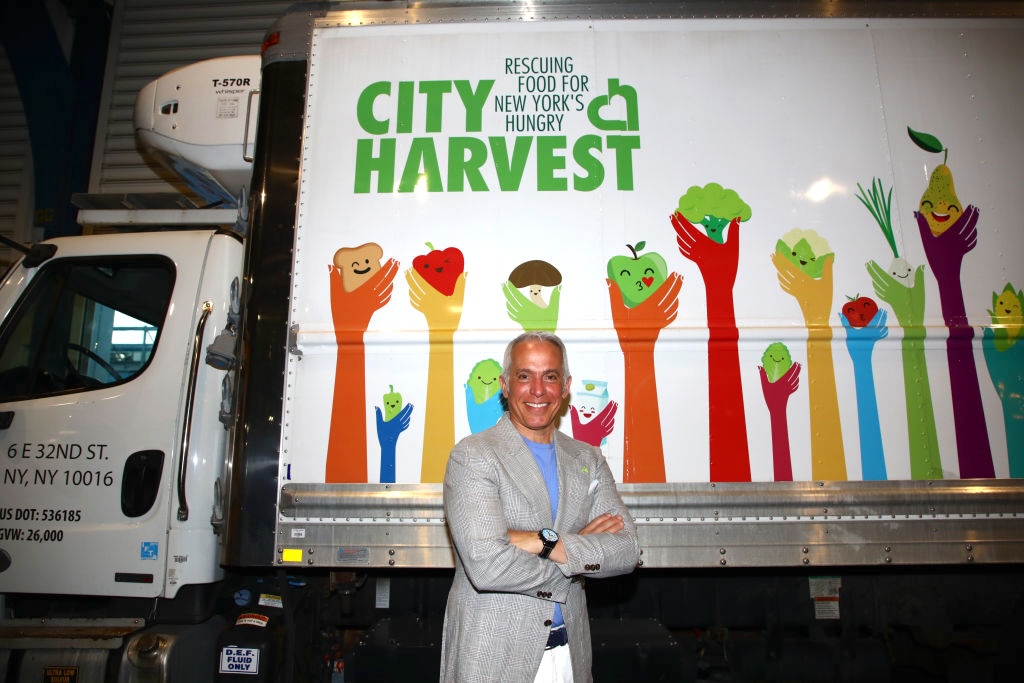
He’s also worked for years with City Harvest, a New York food rescue organization that has distributed an incredible 80 million pounds of food this year to New Yorkers in need. He’s served as chairman of the NGO’s Food Council since 2014.
City Harvest rescues much of its food because of something that might surprise you: expiration dates. “This would not be possible unless a terrible legislation for expiration dates was created. That created a false foundation where we have to throw food out [after its sell-by date] and can’t sell it,” Mr. Zakarian said. “City Harvest came along and said, ‘We’ll take it, and, in less than 24 hours, we can distribute it.’”
When asked how much of the “expired” food the charity gets is still edible, the chef has a stunning answer: “One hundred percent.”
City Harvest receives donations of surplus food from nearly 2,000 businesses, including farms, grocers, restaurants, wholesalers, and manufacturers. But Mr. Zakarian makes sure to distribute healthy food, shopping as carefully as he would for his own family.
Mr.Zakarian attends a City Harvest event in New York City, June 19, 2018. (Getty Images for City Harvest)
“Nothing with high fructose corn syrup. We’re very picky [about] what we take. Fifty percent of what we give away are fresh vegetables,” he said.
City Harvest trucks then deliver the food free of charge to more than 400 food pantries, soup kitchens, and other community food programs across the city. “It’s a very fulfilling process for everyone,” he said. “If you talk to any of the drivers, they’re so happy with what they do. They get paid to make people happy and live better; they give away food all day. What a great way to live.”
The organization holds several fundraisers throughout the year, including an annual fall food tasting that will be held on October 29 this year, at The Glasshouse in New York. Last year’s event raised enough to feed 4 million people.
The Next Generation
As a father of three, Mr. Zakarian has taken his own childhood experience of sharing a meal at the table and passed down the tradition. On any day he’s home, he makes it a point to cook breakfast for daughters Anna and Madeline and son George.
They’ve picked up Dad’s love of cooking. Anna and Madeline published a cookbook called “The Family That Cooks Together” in 2020, when they were 12 and 14, respectively. They also helped start a Junior Food Council for City Harvest that year.
Want to teach your kids to cook? Mr. Zakarian says it only takes one thing.
“Smells. This is why there’s a failure in modern cuisine, that minimalist cuisine: If nothing has a smell, it’s not memorable. Every memory you have of food is the smell.”
Chef Geoffrey Zakarian with his family. (Courtesy of Geoffrey Zakarian)
Mr. Zakarian says nothing draws a kid into the kitchen more than the aroma of something delicious. “You don’t have to ask kids to do anything. They’ll smell something, come by, and say, ‘What’s that, Mom?’ And she’ll say, ‘Well here, try it.’ I’ll say, ‘Do you want to help?’ ‘Sure.’ It’s not forcing them to do anything. It’s the memory of the smells and the clanging of pots and pans.”
Spreading the Joy
He’s also passionate about bringing those memories to other families. His cookware line, launched under Zakarian Hospitality, is designed to “make life better for the average person at home,” he said. He doesn’t focus on obscure items you might use once every 10 years, but basic, good-quality cooking tools you’ll need every day.
His television appearances aim to do the same. “I love these shows because they show people how to nourish their families,” he said. “When people watch a competition show, they love the competition, but at the end of the day, it is captivating their memory with things they want to try.” He calls it “nourishment of the stomach, but also nourishment of the soul.”
As a chef, Mr. Zakarian focuses on what he calls the Mediterranean basket, the diet from Greece and Italy. At his restaurants, “I make menus for food that I enjoy,” he said. “I just try to make food yummy for myself, and if I like it, I would say that 99 percent of my customers will like it.”
But whether he’s cooking for customers or his kids at home, his philosophy is the same.
“If you have everyone sitting around the table, that’s the real joy, that’s where everything happens—all the glances, the looks, the nuanced conversation that comes out,” he said. “If you can get them to the table, that’s the real reward.”
9 Questions for Geoffrey Zakarian
Comfort food? Steak frites.
Most beloved kitchen tool? Paring knife.
3 ingredients you can’t live without? Sea salt, chardonnay vinegar, anchovies.
Underrated ingredient? Miso.
Go-to easy but impressive dish to cook for someone? Spaghetti with lemon.
Daily wellness rituals? Work out five times a week. Don’t skip breakfast. Eat grass-fed beef, full-fat yogurt, fruits, berries. Big fan of honey and dates instead of sugar.
Favorite hobby when you’re not cooking? Golf.
Best advice for home cooks? Start learning to cook with breakfast. Eat your mistakes.
We enjoy this cold-weather soup every year, often by the fire. For parties, we prepare the soup ahead of time, and then we put on a big pot for guests to help themselves. This keeps the mess in the kitchen low and gives us something yummy to sneak off with and eat.
Serves 4
4 tablespoons unmelted butter
1 large butternut squash, peeled and cubed (about 4 cups)
1 medium yellow onion, chopped
2 tart apples, peeled, cored, and cubed
1 tablespoon Madras curry powder
1/4 cup all-purpose flour
3 cups chicken broth
1/2 cup half-and-half
Kosher salt
Freshly ground black pepper
1/4 cup toasted pine nuts, for garnish
Recommended Tools
Immersion blender or regular blender
Melt the butter in a large soup or stockpot over medium heat. Add the squash, onion, apples, and curry powder and sauté for 5 minutes.
Add the flour, stirring well to combine. Add the broth, bring to a simmer, and simmer for 30 minutes, or until the squash is very tender. Let cool for a few minutes.
With an immersion blender, puree the soup in the pot until smooth. Alternatively, carefully puree in batches in a regular blender. Stir in the half-and-half.
Reheat soup gently if necessary, and season with salt and pepper. Garnish with toasted pine nuts and serve.
Recipe Notes
Pine nuts can be toasted in a pan on the stovetop or roasted on a sheet pan in a 325-degree-F oven for 12 minutes. Give a little shake as they cook. Watch them carefully, because they can burn quickly!
If using a regular blender, be careful with hot liquids.
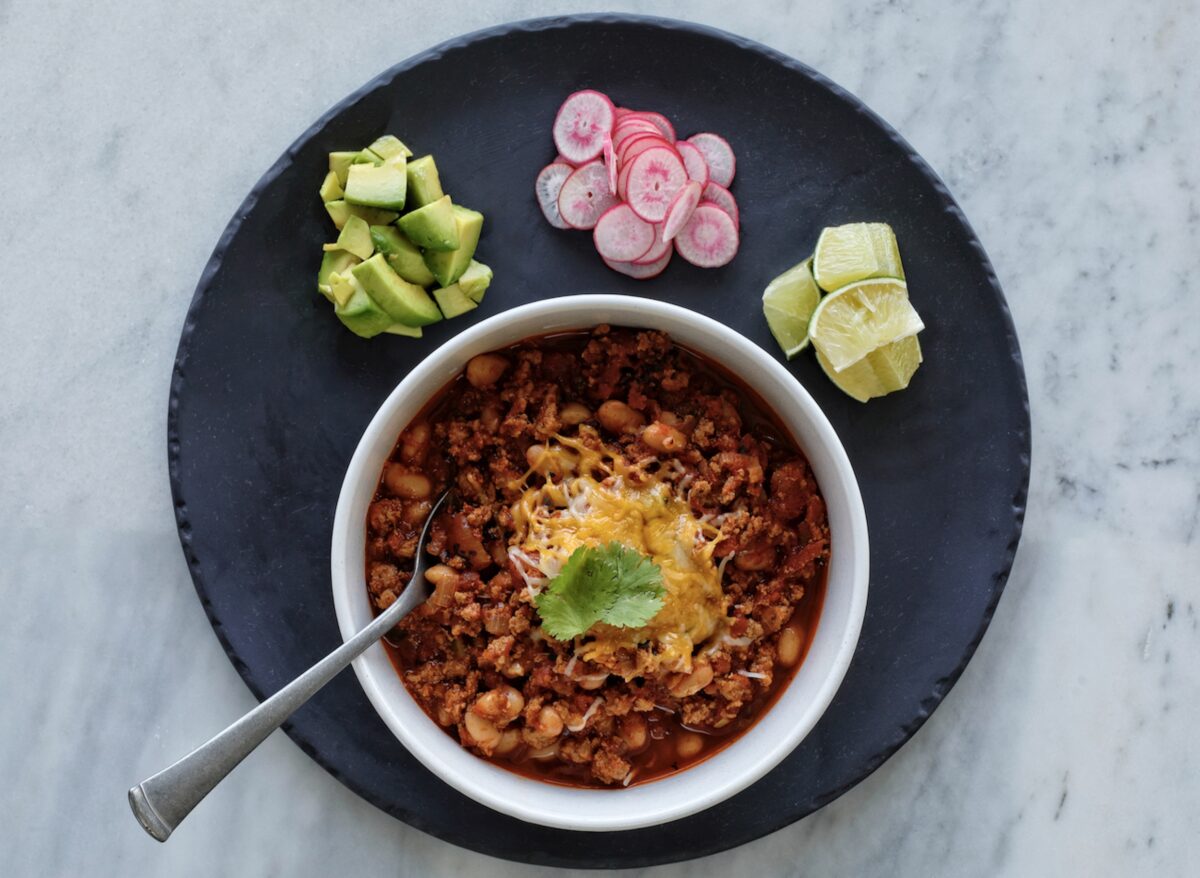
This is the Zakarian TV dinner! Whenever there’s something fun to watch, we make a batch of chili and all gather in the living room. This is the absolute only time we’re allowed to eat dinner in front of the TV, so chili holds an extra special place in our hearts.
Serves 8
For Chili
3 tablespoons extra virgin olive oil
3 pounds ground pork
2 to 3 tablespoons pancetta or bacon, cut into small pieces
Kosher salt
Freshly ground black pepper
2 large onions, chopped (about 3 cups)
6 garlic cloves, finely chopped
2 bunches scallions (white and green parts), chopped (about 2 cups)
2 tablespoons tomato paste
1/4 cup chili powder
1/4 cup ground cumin
1 1/2 cups apple cider
2 (28-ounce) cans whole tomatoes with juice (fire-roasted, preferably), crushed by hand
2 (15.5-ounce) cans small black or white beans, drained and rinsed
2 cups chicken stock
2 tablespoons green Tabasco
For Garnish
1 avocado, pitted, peeled, and chopped, for garnish
1/2 cup chopped cilantro, for garnish
4 radishes, sliced thin, for garnish
Shredded Mexican cheese, for garnish
Lime wedges, for garnish
Recommended Tools
Wide-bottomed Dutch oven or large pot
Wooden or silicon spurtle, or a wooden spoon
Ladle
Heat the olive oil in a wide-bottomed Dutch oven or large soup pot over medium-high heat. Add the pork and cook, stirring and scraping the pan bottom with a spurtle, until browned and cooked through, letting the liquid cook out. This will take 10 to 15 minutes. Caution: Do not rush through this step; it’s crucial. Add the pancetta or bacon and cook with the pork for 1 to 2 minutes. Season with pepper, about 1 teaspoon.
Reduce the heat to medium. Add the onions, garlic, and scallions and cook until wilted, about 5 minutes. Make a space in the pan and drop in the tomato paste. Let the paste toast for 1 minute and then stir it into the pork mixture. Sprinkle in the chili powder and cumin and cook and stir until fragrant, about 2 minutes.
Pour in the cider, rigorously scraping the bottom of the pan with the spurtle to get the brown bits released and incorporated. Cook until the liquid is almost reduced away, 3 to 5 minutes. Add the tomatoes, beans, and stock, then season with the Tabasco as well as about 2 tablespoons salt and 1 tablespoon pepper. Adjust the heat so the chili is gently simmering and cook, uncovered, until the chili is thick and full of character, about 1 1/2 hours.
Ladle the chili into bowls and serve garnished with avocado, cilantro, radishes, Mexican cheese, and lime wedges.
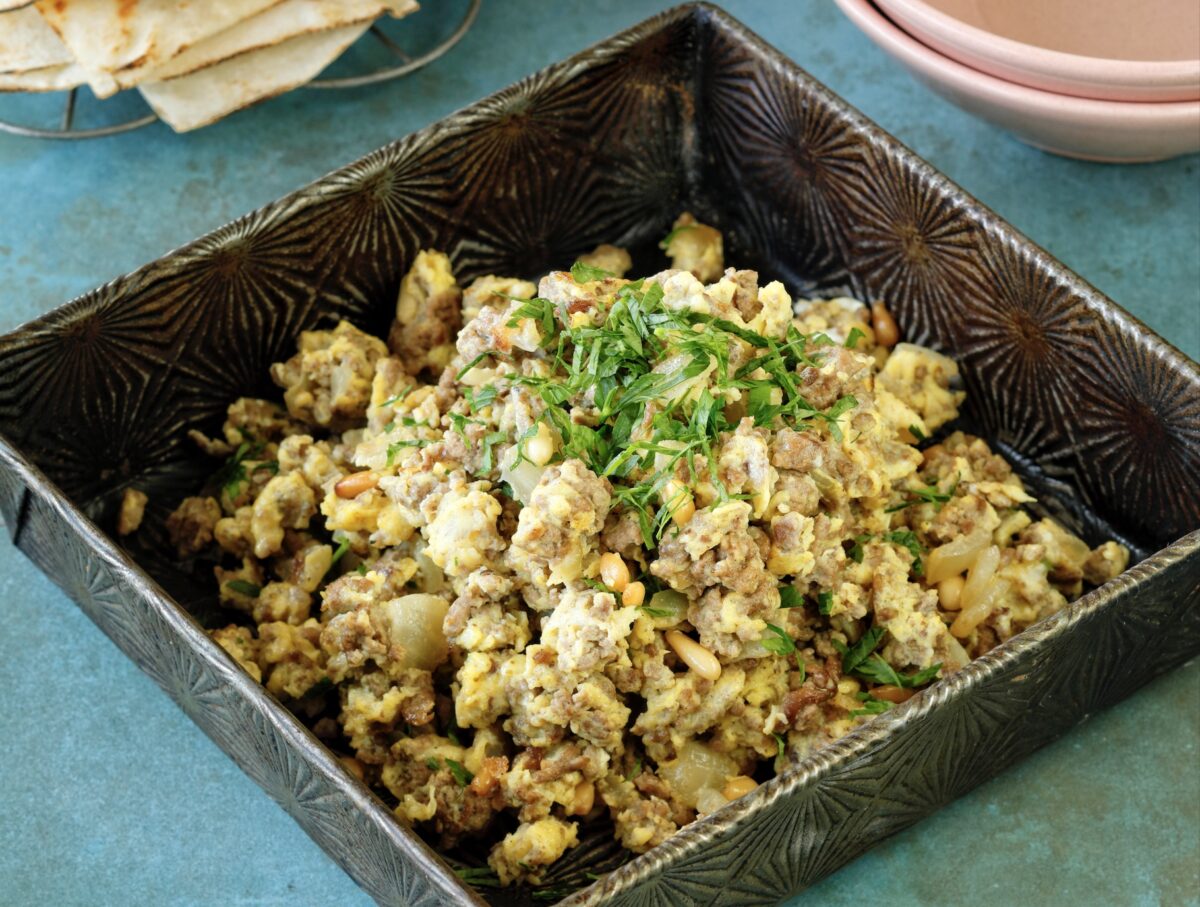
During the holidays, our grandmother Marie cooks traditional Middle Eastern dishes for our large extended Lebanese family, much to everyone’s delight. There are always leftover pieces of raw lamb she doesn’t need, so over the years, she started frying them with pine nuts and onions that she’d then scramble together with eggs for breakfast the next morning. As soon as the dish hits the table, we jump to get it on our plates. Because we enjoy this meal so much, we now shop for lamb at all times of the year just to make the breakfast “leftover dish” for ourselves!
The picture shows traditional Syrian bread, which can be hard to find, but regular pita works just as well to scoop up those delicious eggs.
Serves 4 to 6
2 tablespoons extra virgin olive oil
1 medium yellow onion, diced
3/4 pound ground lamb
3/4 teaspoon ground cinnamon
1 1/4 teaspoons kosher salt, plus more for seasoning
1/4 teaspoon freshly ground black pepper
1/4 cup pine nuts, toasted
6 large eggs
2 tablespoons unsalted butter
1/4 cup coarsely chopped Italian parsley
Warm pita bread, for serving
Recommended Tools
Cast iron skillet
silicone spatula or wooden spoon
Heat the olive oil in a large skillet (preferably cast iron) over medium heat. Add the onions and cook until softened, about 5 minutes. Add the lamb, cinnamon, salt, and pepper. Cook, stirring occasionally, until the lamb is browned and cooked through, about 10 minutes. Add the pine nuts.
Meanwhile, in a small mixing bowl, whisk the eggs and season with salt and pepper. When lamb is fully cooked, push the mixture to the edge of the pan. Add the butter to the center of the pan and allow to melt. Pour in the eggs. Using a silicone spatula or wooden spoon, stir the eggs in large circles, allowing large curds to form. Once the eggs are almost cooked, incorporate the lamb mixture into the eggs and remove from the heat.
Divide the eggs among plates, garnish with parsley, and serve with warm pita bread.
The children tell me that they could eat this every day, so it’s something we have at least weekly, even in the heat of the summer. This is a much lighter variation of beef pho, and my mother’s secret is to always have some black cardamom on hand. If you were out of all your spices, this is truly the only one you would need for a good bowl of pho ga. I also use dried jujubes and daikon for a natural and medicinal sweetener.
You can substitute zucchini noodles or homemade tagliatelle for the rice noodles. For increased nutrient density and an extra crunch without affecting the flavor profile of the soup, I quickly blanch some bok choy and cut it up for the family to enjoy.
Serves 4 to 6
For the Soup
10 cups spring water, or more as needed
1/2 daikon, peeled and quartered (optional)
10 dried jujube apples or 1 (4-ounce) Fuji apple
1 (4- to 5-pound) pasture-raised chicken
5 star anise pods
3 whole cloves
1 cinnamon stick
2 tablespoons (36 g) black cardamom seeds
1 tablespoon coriander seeds
1 tablespoon fennel seeds
1 large onion, halved
1 (4-inch) piece fresh ginger, halved
1 tablespoon sea salt
5 tablespoons fish sauce or fermented anchovy sauce
3 tablespoons maple sugar or coconut sugar (optional)
1/2 small yellow or red onion, very thinly sliced, or pickled red onions
4 to 6 Thai basil sprigs
4 to 6 mint sprigs
Bean sprouts
Lime wedges
Fresh Vietnamese culantro or sawtooth (optional)
Bird’s eye chiles, sliced (optional)
Hoisin sauce
Sriracha or sambal oelek
In a large pot, combine the water, daikon (if using), and jujube apples and bring to a boil. Add the chicken, plus more water if needed to cover the chicken, and return to a boil.
Meanwhile, in a small skillet, combine the star anise, cloves, cinnamon, black cardamom seeds, coriander seeds, and fennel seeds and toast over high heat for 3 to 4 minutes. Transfer the toasted spices to a spice bag or tea strainer. (Alternatively, you can put the spices directly in the pot of broth and strain them out before serving.)
To char the onion and ginger, turn a gas stove burner to high heat or a grill to medium-high. Using tongs, carefully place the onion and ginger directly on the burner or grill grates. Allow them to cook undisturbed for a few minutes, until the bottom is charred and blackened. Use the tongs to flip the onion and ginger to char the other side. Once charred, remove the onion and ginger from the heat and allow to cool slightly. Using your fingers or a knife, peel off the blackened outer layers of the onion and ginger and discard. (Alternatively, you can place the onion and ginger on a rimmed baking sheet and broil them in the oven. Keep an eye on them so they don’t burn!)
Add the spice bag, onion, and ginger to the broth. Simmer for 1 hour, occasionally skimming off the scum that rises to the top.
Remove the chicken from the pot and pierce through the thigh with a chopstick or fork to check if the juices run clear. If not, return it to the pot to simmer for a while more, until fully cooked. Set aside to cool.
Remove the daikon, apples, spice bag (or whole spices), onion, and ginger from the broth. Season the broth with the salt, fish sauce, and sugar, if using.
Remove the chicken meat from the bones and cut it into 1/2-inch pieces for easy handling with chopsticks. Alternatively, you can hand-tear the chicken pieces and add them directly to the bowls.
Bring a large pot of water to a boil. Add the bok choy and blanch for 1 to 2 minutes. Drain the bok choy and cut into bite-size pieces.
Cook the rice noodles according to the package instructions until chewy. Rinse under cold running water and drain.
To serve, divide the noodles into each serving bowl and top with chicken meat and bok choy. Ladle in the hot broth and top with your choice of garnishes. Offer hoisin sauce and sriracha or sambal oelek at the table.
Store leftovers in an airtight container in the refrigerator for up to 4 days or in the freezer for up to 6 months; if freezing, make sure to leave at least 1 inch headspace in your jars.
Time Hacks
You can start with chicken bone broth and simmer for 1 hour with the spices, onion, and ginger and serve with chicken meat.
Alternatively, use the carcass from a rotisserie chicken to make the broth, then serve the meat with the soup.
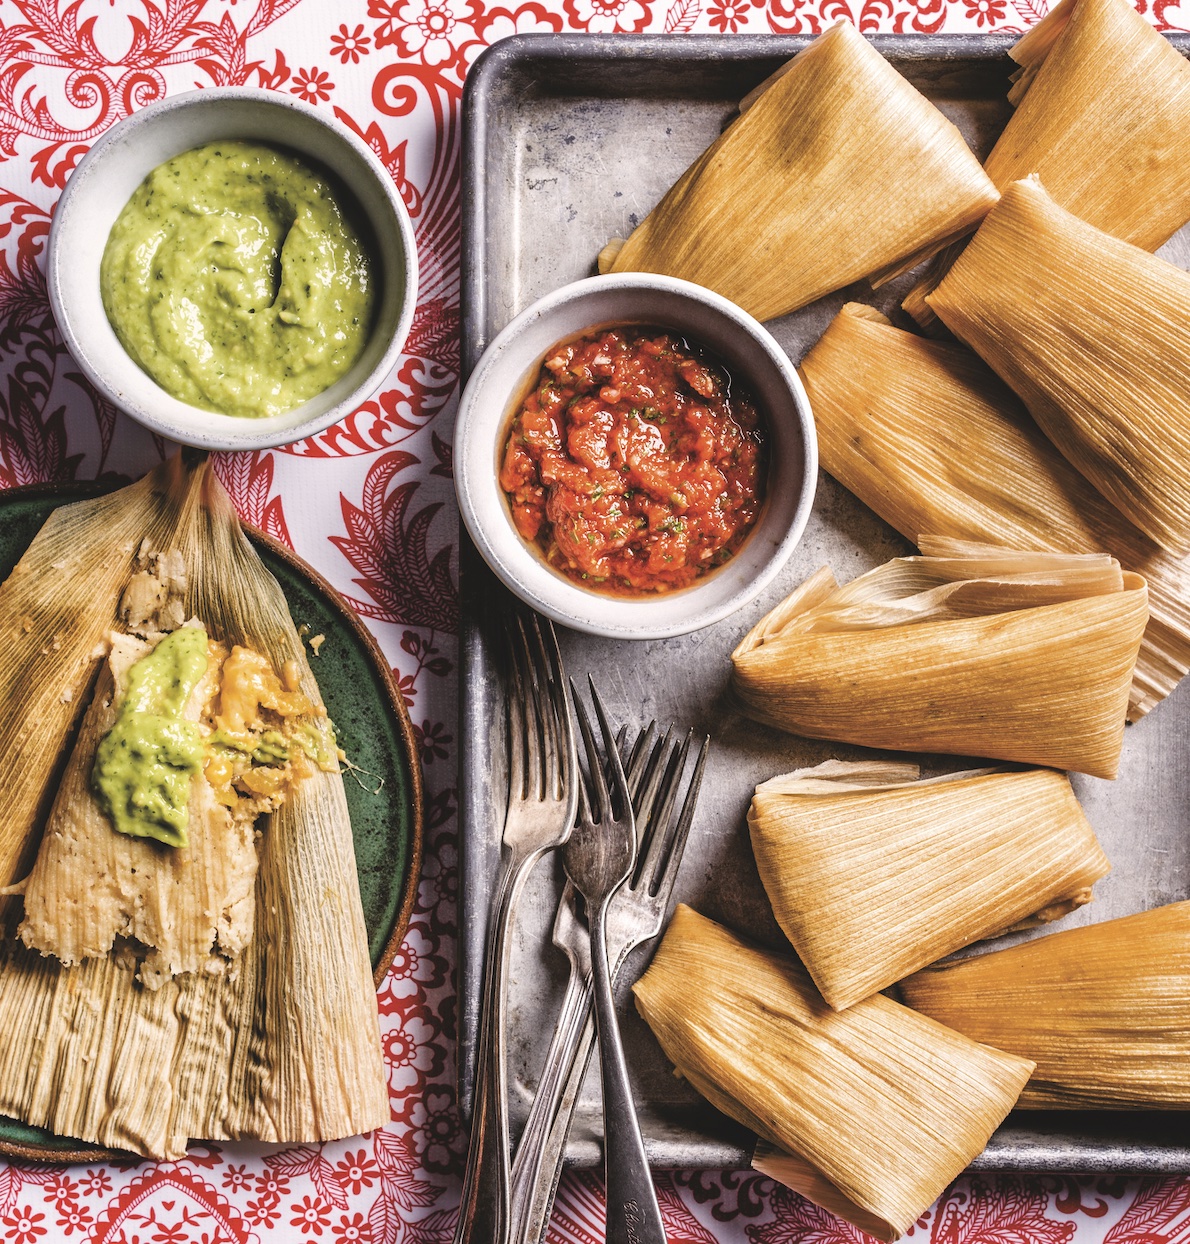
“I know for a lot of families, Christmas means a roast, but in my neighborhood, Ebenezer Scrooge wouldn’t be giving out a grand turkey. He’d be giving out tamales,” said Danny Trejo. “To me, Christmas has always meant a full table of tamales.”
The legendary “Machete” star might be most recognizable from his villainous, tough-guy roles on-screen—but he also makes a mean chef. Food and hospitality have always played a major role in the actor-turned-entrepreneur’s life, and Mr. Trejo now has a growing restaurant empire that spans multiple locations of Trejo’s Tacos, Trejo’s Cantina, and Trejo’s Coffee and Donuts in Los Angeles; and two cookbooks, “Trejo’s Tacos” and “Trejo’s Cantina.” He shared a recipe from his latest.
“If you’ve never made tamales because you think they’re difficult, this recipe will change your mind,” he writes. “With just an hour of prep, you’ll have two dozen fluffy, amazing tamales to eat for dinner, lunch the next day, with leftovers to freeze and eat down the road.” His recipe uses a classic cheese and chile filling, but he says it works well with other fillings, too: Try chicken or jackfruit tinga, or beef birria.
(Hernan Rodriguez)
Super-Easy Tamales
Makes 30 tamales
30 dried corn husks
1 1/2 cups olive oil
10 cups (2 pounds) masa harina, such as King Arthur
2 (10-ounce) cans roasted chiles, such as Hatch, roughly chopped
Soak the corn husks in a large bowl filled with water until soft, about 1 hour. Place a few cans of beans on top to keep them submerged.
In another large bowl, combine the olive oil, masa harina, baking powder, salt, and broth. Mix with your hands until a pliable dough forms. Knead until smooth, 3 to 5 minutes.
Place a corn husk on a cutting board with the wide end toward you. Using a large spoon, spread 1/4 cup of dough in the center. Shape it into a rough round about 4 inches in diameter. Place 2 tablespoons of cheese lengthwise in the center of the dough. Sprinkle 1 tablespoon of chiles on top of the cheese.
Lift the two sides of the corn husk in toward the center like a book so the two sides of masa meet and cover the filling; then, holding the excess corn husk together, fold and wrap it to one side around the tamale. Fold the top and bottom ends over the tamale and turn it over to hold the folded sides down. Repeat until you have about 30 tamales.
In a large pot fitted with a steamer basket, add enough water to just come up to the level of the steamer basket. Working in batches, arrange the tamales vertically in the steamer basket and turn the heat to medium. Once the water starts to steam, cover the basket and cook until the tamales are fluffy and tender and the cheese is melted, from 30 minutes to 1 hour, depending on how many you cook at a time. The tamales are super tender when they come out of the basket, but will firm up as they sit. Let them cool for 30 minutes before serving. You can also let the tamales completely cool and freeze for up to 1 month.
(Penguin Random House, LLC)
Reprinted with permission from “Trejo’s Cantina” by Danny Trejo with Hugh Carvey, copyright 2023. Photographs by Larchmont Hospitality Group LLC. Published by Clarkson Potter, a division of Penguin Random House, LLC.
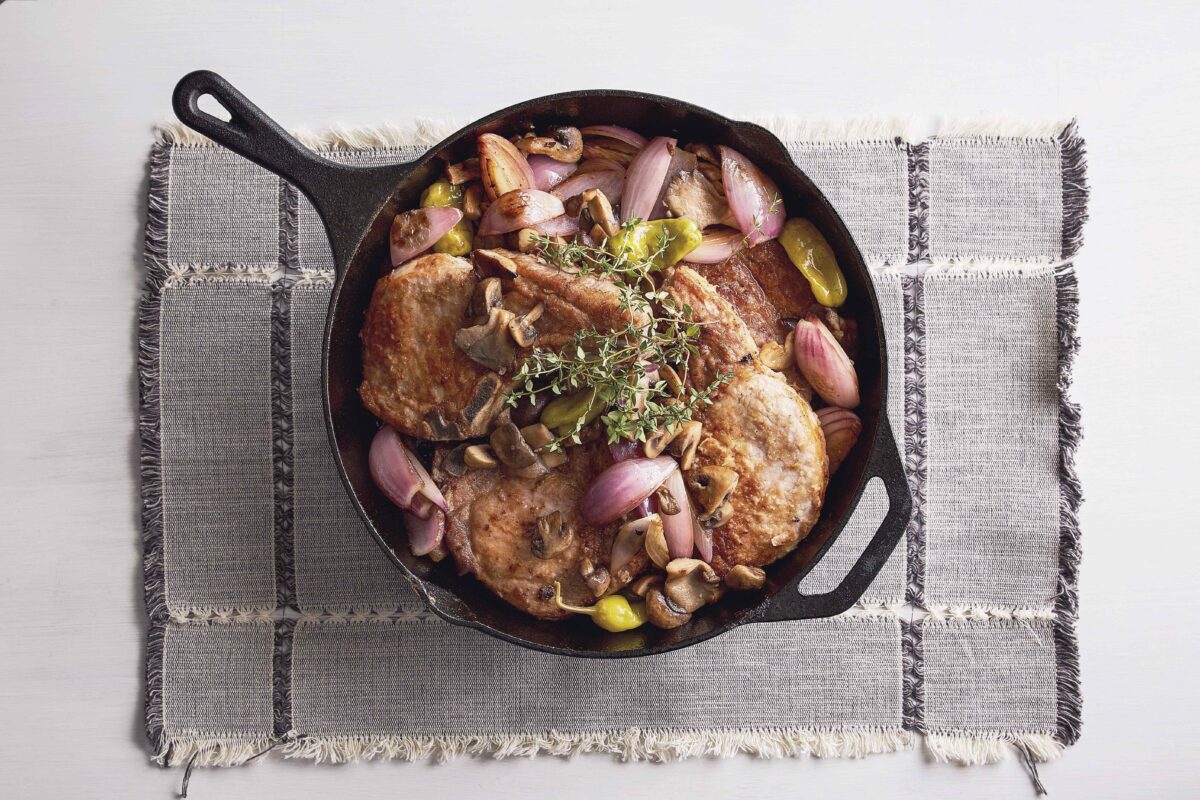
My family loves this dish. The pork is relatively low-fat for meat, and the pickled peperoncino peppers give the whole thing a bit of spicy kick. You can prepare this dish with rib pork chops, as called for in this recipe, or loin pork chops, which look like T-bones and are often less expensive. The one important thing to pay attention to is the size of the chops: Make sure they are all about the same size, so they take the same time to cook.
I really like pickled Tuscan peperoncini. I use them in an antipasto, in sandwiches, to make spicy pasta sauces, and I especially love to cook them with pork or chicken. They are a greenish-yellow color, about 1 to 1 1/2 inches long, usually pickled whole with the stem on. You can find them in the Italian or Greek section of the grocery store, usually in a long cylindrical glass bottle.
Serves 4
4 bone-in pork rib chops, 1 inch thick
Kosher salt
All-purpose flour, for dredging
3 tablespoons extra-virgin olive oil
8 pickled Tuscan peperoncini, plus 2 tablespoons brine from the jar
1 large red onion, cut into 8 wedges, left attached at the root end
3 sprigs fresh thyme
1 pound mixed mushrooms (such as cremini, shiitake, button), thickly sliced or quartered
1/2 cup dry white wine
1 cup low-sodium chicken stock
1/4 cup chopped fresh Italian parsley
Season the pork chops with 1/2 teaspoon salt. Spread some flour on a plate, and dredge the chops on both sides. Heat a large cast-iron skillet or low Dutch oven over medium-high heat. Add the olive oil. When the oil is hot, add the chops, and brown on one side, about 3 minutes. Flip, and brown the second side, 2 to 3 minutes more. Remove them to a plate.
Add the pickled peperoncini and brine. Let them sizzle for a minute; then add the red onion wedges and thyme sprigs and brown the onions on both cut sides, about 3 minutes. Add the mushrooms, and stir to coat them in the pan juices. Season with 1 teaspoon salt. Once the mushrooms have begun to wilt, add the white wine, and simmer to reduce it by half. Pour in the stock, and return the liquid to a simmer. Arrange the chops on top of the mushroom mixture, and cover. Adjust the heat to simmering, and simmer until the chops are just cooked through, about 10 minutes.
Uncover, and remove the chops to a platter or plates. Bring the sauce to a boil to reduce and thicken it slightly, about 1 minute. Stir the parsley into the sauce, then pour the sauce over the chops to serve.
A cowgirl at heart, singer and actress Reba McEntire shows off her custom boot closet. (Courtesy of Reba McEntire)
Some would say the McEntires are a very set-in-their-ways, stubborn, hardheaded bunch of people. But I think that hardheadedness is what got Daddy to where he was, Grandpap to where he was, and his father, Pap, to where he was. Some might say it wasn’t all that far—but it was much further than where they started!
None of us McEntires came from money, but each generation’s been a little more prosperous than the one before it. My daddy, Clark, was determined to make a better life for himself than the one he’d been handed. Like Grandpap before him, Daddy had the rodeo bug. He knew that rodeo couldn’t pay all the bills, but it sure helped get him started.
Take, for instance, one time when Daddy won a roping competition. The prize was a new car and 500 dollars cash. He gave it all to Mama and sent her to swap it for 80 acres of land that Uncle Dale, Mama’s brother, owned. That gave Daddy enough space to expand his ranch with more cattle. It was the start he needed. A few years later, in 1957, Daddy and Mama were able to buy a much bigger plot of land in Chockie, so he moved the family and all the cattle over there. Not exactly the land of milk and honey, but little by little, he was moving on up.
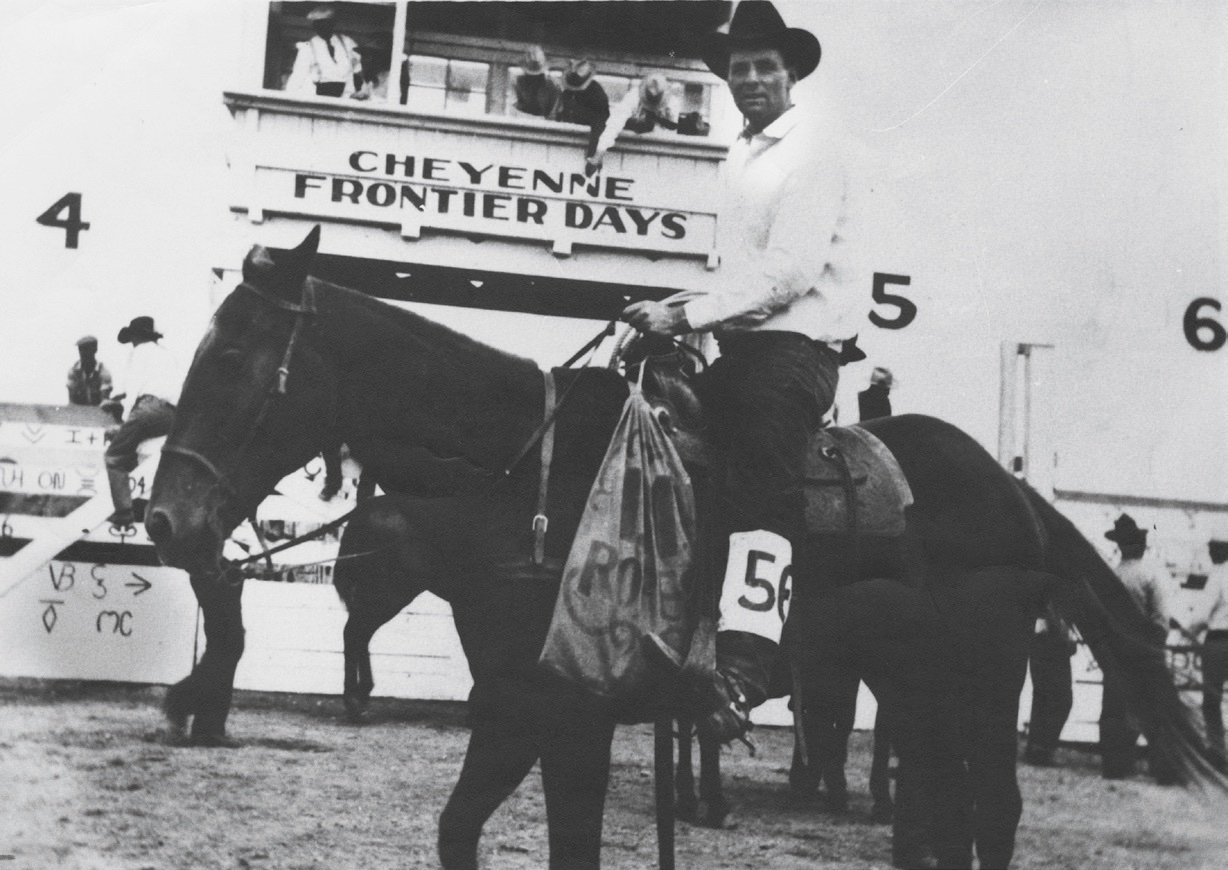
Ms. McEntire’s grandfather, John McEntire, competing at Cheyenne Frontier Days in Cheyenne, Wyo., 1934. (Courtesy of Reba McEntire)
Land in Chockie was only $6.40 an acre, and there was good reason for that! A lot of neighbors called it “sorry land,” and they warned Daddy not to buy it. It was rocky, hilly, and didn’t grow much except briars and scrub brush, but he saw something no one else saw in that “sorry land.” He turned a profit selling timber to the paper mill and rocks to the architects in Dallas. Then he struck gas.
That sorry land turned out to be worth more than anyone realized.
Daddy liked the rodeos, but he loved ranching. Rodeoing and selling timber, rocks, and natural gas all helped in the progression of our ranch. Daddy had to travel to compete in rodeos, but he wanted to be home on the ranch.
But ranch life is not an easy life. Maintaining the land and cattle takes time, and you can’t skip a day just because you’re worn out. Working the land was a whole family affair. The only time you wouldn’t find us kids helping out was when we were in school. I thought that going to college would give me a break. Nope. I was wrong. Daddy had leased some land halfway between home and the Southeastern Oklahoma State University in Durant, Oklahoma. So every other day, after my classes, I loaded 30 fifty-pound sacks of feed into my pickup truck and fed the 300 head of cattle.
Not quite the college experience everybody else had!
I didn’t really know anything else though. I had started pitching in before I could even sit in a saddle. I don’t remember exactly the first time I was on a horse, but it feels like I was born riding. Us kids spent a lot of time rounding up cattle. It was rough country, and often we’d have to ride through brush and briars taller than we were on the off chance we’d find even one lonely steer. There was always more work than hands to do it. We got cattle in the spring, straightened them up, and shipped them off to the feed lots in the fall.
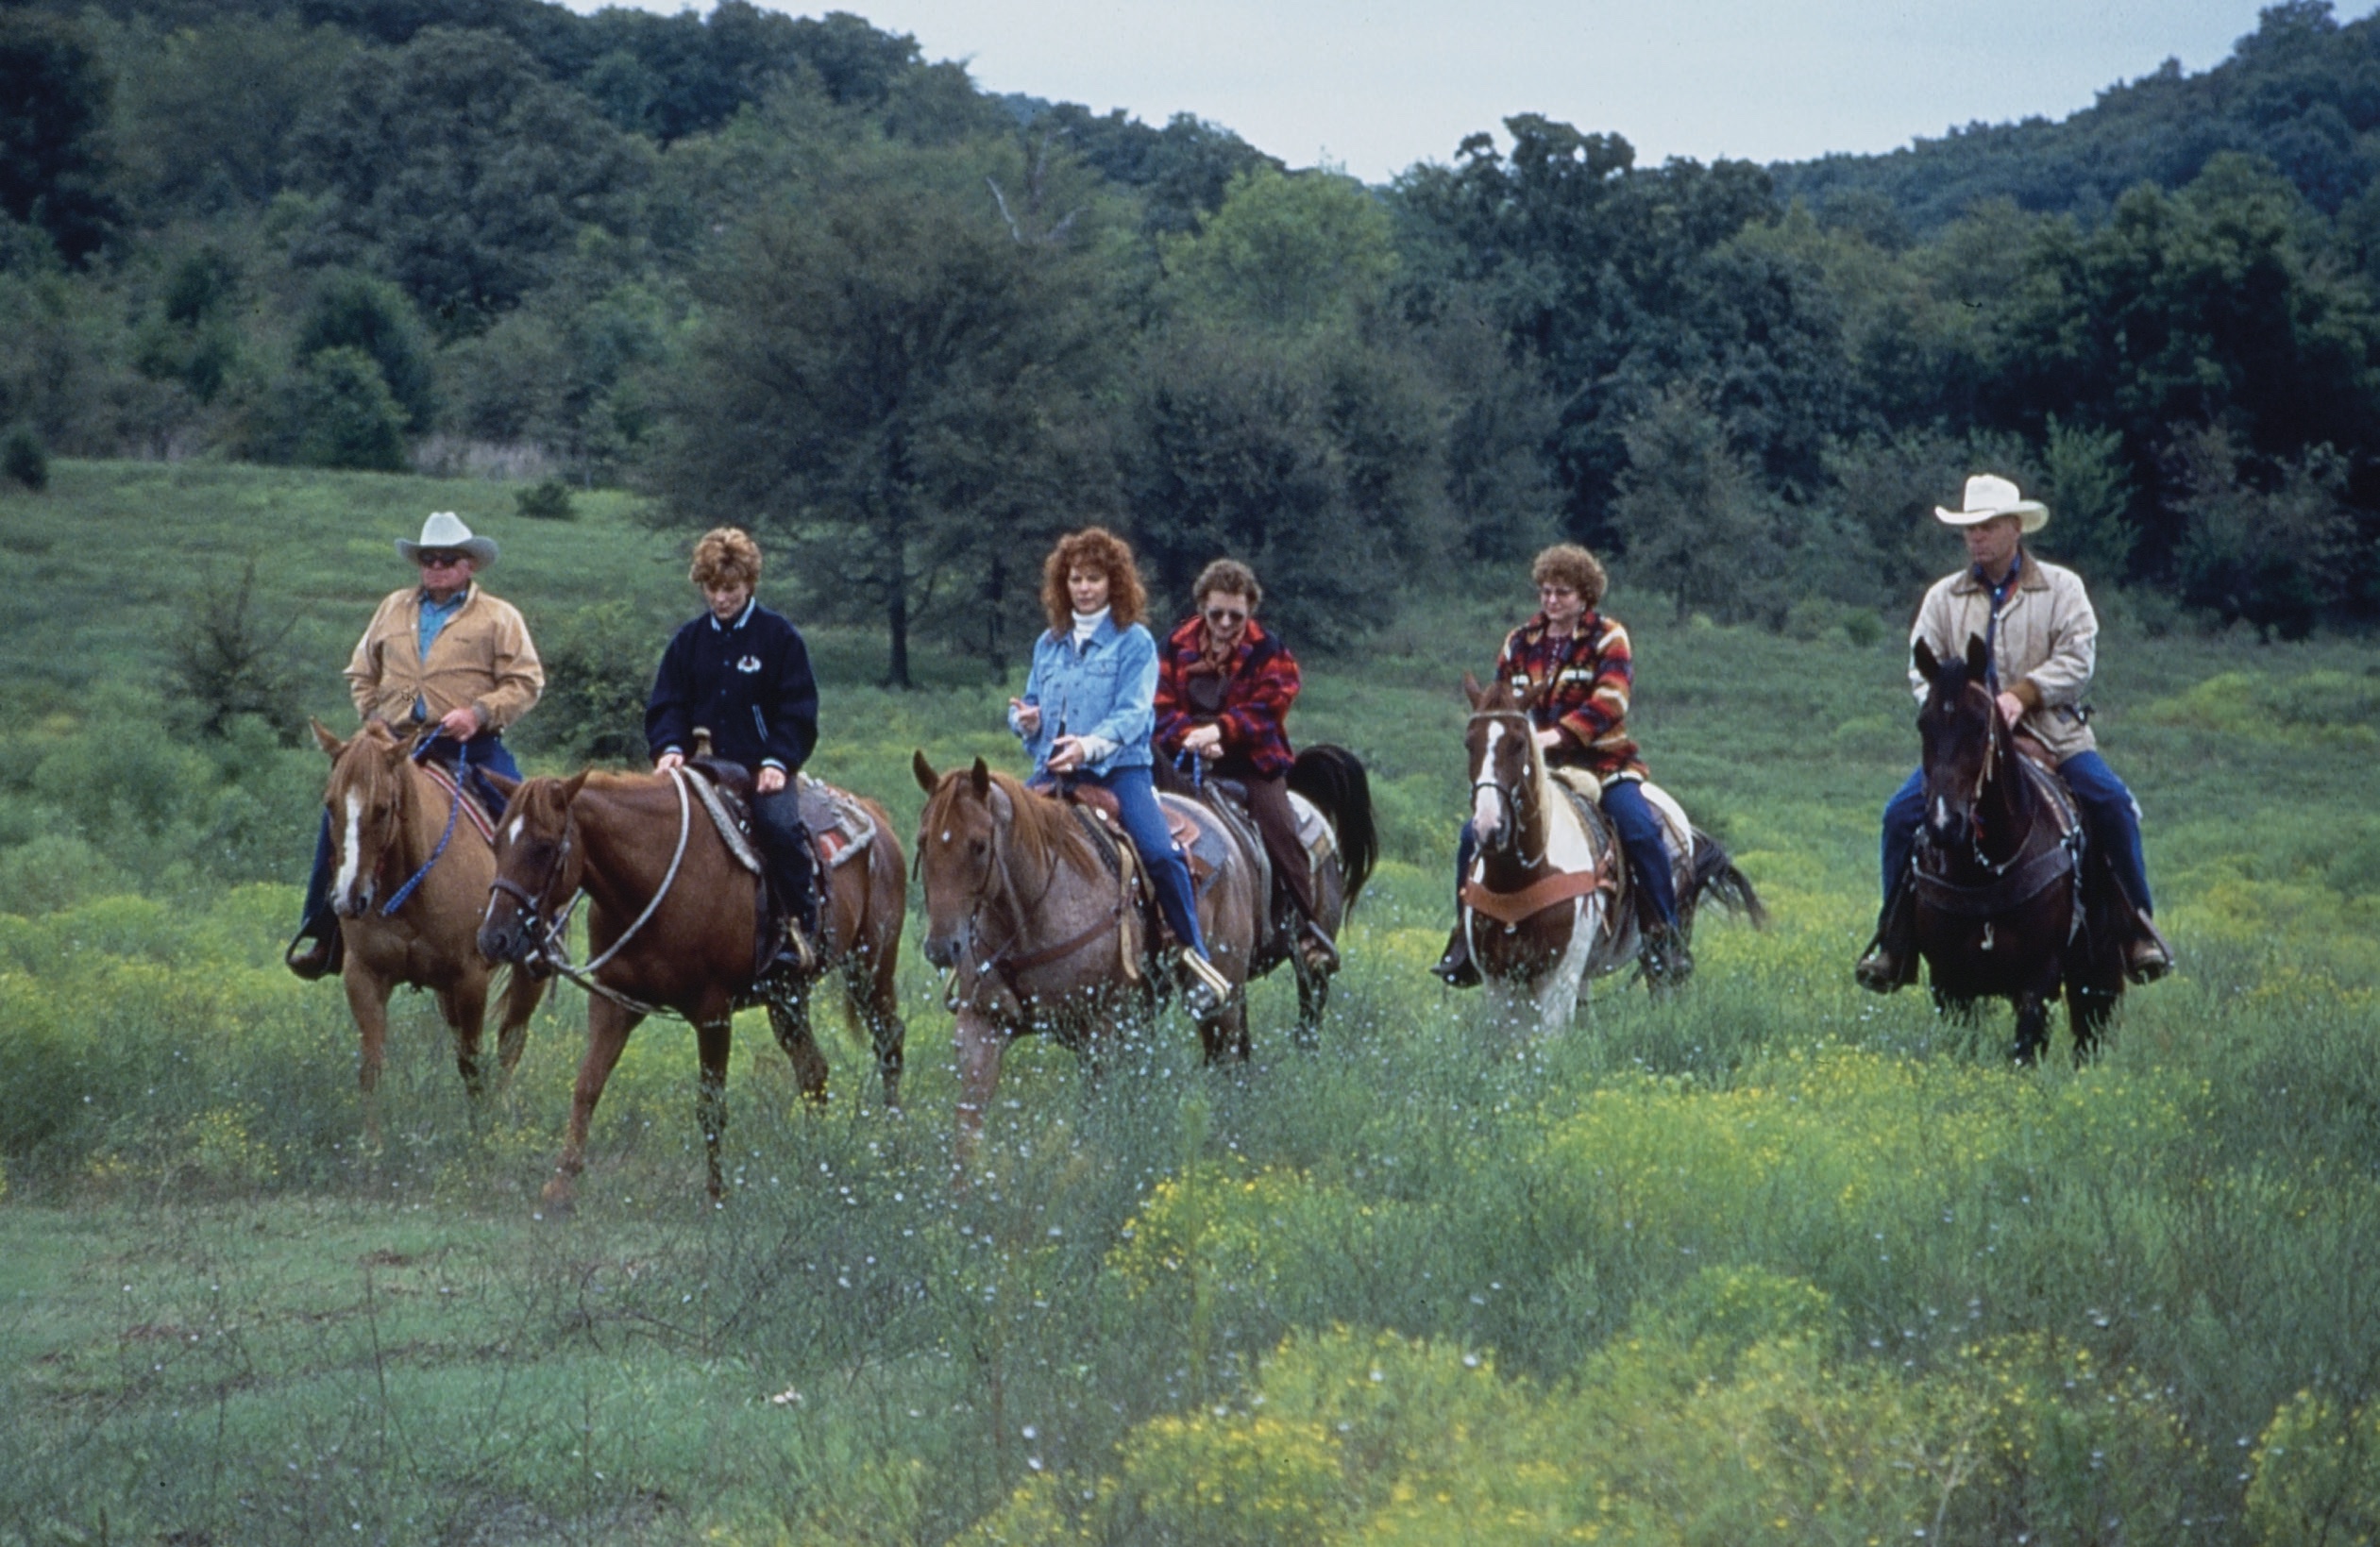
Reba McEntire (center) rides on the family ranch in Chockie, Okla., alongside her parents and siblings Susie, Alice, and Pake, while filming the “Reba: Starting Over” CBSTV special in 1995. (Courtesy of Reba McEntire)
Daddy always had a plan to get the job done. Problem was, he wasn’t the best at relaying his plan to the rest of us. He was usually looking the other direction or doing three things at once when he was giving us our instructions for the day. Most of the time, we only got a quarter of what he was trying to tell us. We always looked to Grandpap for an interpretation. I’m sure glad we had him to help us out!
The most important thing about helping out on the ranch was getting in line, doing your part, and following instructions. If our instructions were to sit at a gate until Daddy returned, under no circumstances were we going to abandon our posts. You sat at that gate until Daddy came back and told you that you could leave. It could be several hours, but that didn’t matter. Hot or cold, rain or shine, you stayed glued to your saddle.
It was out there in those hills that I first learned that the work is in the waiting.
Fast-forward 15 years, when I got into the music business. I knew less than nothing about how it all worked. I thought that once your record got on the radio, you got a tour bus and a big ol’ check. You’d made it. You were a big star. Wrong!
I remember being so excited when I heard my debut single playing on our staticky, old radio for the very first time. Mama, Susie, and I were all sitting on the floor, crying with joy, thinking, “This is it.”
But then—not much happened. No fancy tour bus or big royalty check appeared. I felt pretty sure that God had called me to the dream of singing, but much like my daddy giving me instructions up in the hills, it felt like I had only gotten a fourth of what God said, and I knew I needed to wait for more information. So just like I learned as a kid, I stayed patient. And I kept working.
“Not That Fancy: Simple Lessons on Living, Loving, Eating, and Dusting Off Your Boots” by Reba McEntire (Harper Celebrate, 2023).
From hearing that first song on the radio, I spent the next seven years traveling around, playing everywhere I could, living on greasy burgers and corn dogs at truck stops and county fairs from Los Angeles to Boston—seven years of performing at fairs, rodeos, and honky-tonks, singing over bar brawls, tractor-pull competitions, and bull sales. Seven years of patience before I had a real hit, “Can’t Even Get the Blues,” in January 1983.
Even with that hit, the first time I headlined my own show, in 1984, only 800 people showed up, and I actually lost money. I had to write a check to get out of town because I didn’t sell enough tickets. And I thought, “Welcome to the big time!” I sure did appreciate the few who did show up, though!
Thank God for that McEntire determination.
When it came my turn to be a parent, I was determined to teach my son, Shelby, how important hard work is too, but I didn’t need to worry. From an early age, Shelby was a very determined young man. He has a great work ethic. When it came time for him to start his own career, he put his nose to the grindstone. When Shelby told me he wanted to be a race car driver, I wanted to help but had no clue where to start. If there had been a “Racing for Dummies”book, I would have bought 10. I asked anyone I could think of for information, but no one I knew had much advice to give. Scott Borchetta, head of Big Machine Records and a former race car driver himself, told me to buy him a go-kart. But Shelby already had a go-kart! So, we bought Shelby a membership to the Skip Barber Racing School. It’s a school that teaches kids the racing business, and it allowed him to race in as many races as possible. You have to pay your dues in racing, just like you do in the rodeo and music businesses. Shelby raced in the Southern and the Western series. He drove eight to nine races a day for three days every weekend. I gave him my airline miles and hotel points from years of touring, and he flew on Southwest and stayed in the cheapest motels to make the most of it. Funny part was, he was too young to rent a car, so he had to get a taxi or bum a ride to the track.
Ms. McEntire with her son, Shelby, at the race car track. (Courtesy of Reba McEntire)
Shelby could have followed his daddy’s, Narvel Blackstock’s, footsteps into music management, but he chose to chart his own course. He’s now into real estate and developing property. You don’t think your kids listen to half of what you tell them, but Shelby did. I’m so proud of him. He’s kind and confident and is building a life that he’s proud of and that makes him happy. And he still wants me to be a big part of that. I am so grateful.
Most of what you hope for in this life takes time and some old-fashioned stick-to-itiveness. None of us in the McEntire family were overnight successes. From generation to generation, we just keep learning, dreaming, and working hard.
One thing I’m sure of: Good things won’t come if you give up and go home.
We top burgers at Reba’s Place with these crisp, warm, traditional Southern delights. But I like them alongside a big ol’ bowl of pinto beans and cornbread as well.
Prep Time: 20 minutes
Cook Time: 20 minutes
Makes 4 to 6 servings
1 quart peanut oil (or vegetable oil), for frying
4 large green tomatoes (very firm), sliced 1/2-inch thick
1 teaspoon kosher salt, divided
1 cup all-purpose flour, divided
1/2 teaspoon freshly ground black pepper, divided
2 egg whites
1 tablespoon water
1/2 cup masa harina (also called “corn masa” or “corn flour”)
1/2 cup fine yellow cornmeal
1/2 cup grated Parmesan cheese
1 tablespoon Cajun seasoning, divided
1/2 teaspoon granulated garlic
1/2 teaspoon granulated onion
1/2 teaspoon celery salt
1/2 cup Reba’s Place Pimento Cheese, for serving
1/2 cup spicy chow chow relish, for serving
2 chives, finely chopped, for garnish
Attach a thermometer to the side of a large Dutch oven and add the peanut oil. Heat the oil to 350°F and maintain the temperature within a range of 25°F. Line two baking sheets with parchment paper. Set a cooling rack on top of a third baking sheet and place it next to the Dutch oven.
While oil is preheating, arrange the tomato slices in a single layer on a cutting board and sprinkle with 1/2 teaspoon of salt.
Place 1/2 cup of flour, 1/2 teaspoon of salt, and 1/4 teaspoon of pepper in a shallow bowl. Whisk to combine. In a second bowl, whisk together the egg whites and water until lightly frothy. Place the remaining 1/2 cup of flour, masa harina, cornmeal, Parmesan, 2 teaspoons of Cajun seasoning, garlic, onion, celery salt, and remaining 1/4 teaspoon of pepper in a third shallow bowl. Whisk to combine.
Pat the tomatoes dry with a few sheets of paper towels. Dredge a slice in the flour mixture, flipping to coat both sides. Submerge the slice in the egg whites. Allow the excess to drip back into the bowl, then transfer to the cornmeal mixture. Press gently to adhere the breading and flip to coat both sides. Transfer the tomato slice to the parchment-lined baking sheet. Repeat with the remaining slices.
Fry the tomato slices 4 at a time until deeply golden brown, about 2 minutes on each side. Carefully lift them from the oil using a deep fryer skimmer and transfer to the cooling rack. Sprinkle immediately with a bit of Cajun seasoning. Repeat with the remaining tomato slices.
To serve, arrange the fried green tomatoes on a serving plate and spoon pimento cheese and spicy chow chow relish over the top. Sprinkle with chopped chives and serve immediately.